14 simple tips for mobile photography

14 Simple but Important Tips for Better Mobile
Photography
You can enhance the quality of your photos if you observe some simple tips in mobile photography. Here, we aim to point out 14 very simple but important tips to improve the photos you take with your phone to a great extent. Some of these tips and tricks in this article may seem obvious, but to be fair, many of us forget them when we’re taking photos.
1.Clean the
camera lens before taking photos with your phone
Mobile phones spend a lot of time in our pockets, bags, or hands and as a result get dirty. When dirt, dust, grease, and fingerprints are left on the lens, they will impact the quality of your photos. If the lens of your camera is dirty, trying to take a good photo is in vain. Dirt prevents light from entering the camera sensor and thus creates blurred, smeared, and ill-lit spots. A clean lens ensures taking clear and clean photos with mobile. It is necessary to clean the camera lens whenever you take your phone out of your pocket for photography. Use a soft small cloth made for cleaning lenses. Using coarse cloths may lead to scratching the glass on the lens and spoil the quality of photos taken by mobile phones.

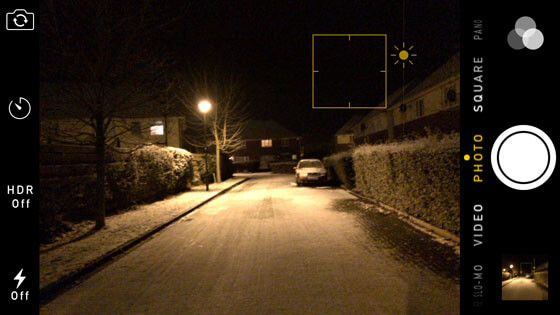
2. Set camera’s
focus
The most crucial point that you should pay attention to
while photographing is placing the main subject in full focus. To determine the
point of focus on iPhone and many other smartphones, you just need to tap where
your subject is placed on your screen. On iPhone, there is a small yellow box
shown on the spot to confirm the point of focus.
If your subject is in movement, select the point of focus
just before taking the photo to ensure correct focus of the subject. After you
have taken a clear photo of it, you can use the various available editing apps
in order to blur the background and direct attention to the subject if you wish
to do so.
Make sure the subject be in full focus. You can determine the point of focus manually by tapping the screen. On some smartphones, you can also lock the focus by holding your finger on the point of focus.
3. Set exposure
manually
On iPhone and many other smartphones, when you tap on the screen to determine the point of focus, the camera uses it to adjust the exposure as well. Put simply, the exposure determines the level of darkness or brightness of the photo. Relying on camera automatically adjusting exposure is not always ideal. For example, if the subject is placed on the dark part of the frame, this could result in an over-exposed photo and vice versa. If your phone allows manual exposure adjustment, then you should use this feature.

4. Use the right
lens
Use the right lens according to the subject in multi-camera mobile phones. The tele-photo lens is better for portrait photos with closed view and the super-wide lens is great for landscape photography.
5. Don’t use the
digital zoom
Most smartphone cameras are equipped with a zoom feature that is adjusted by pinching the screen. However, unfortunately, the zoom on most smartphones is digital not optical. In fact, what happens in digital zoom is that the picture gets cropped as you zoom. Therefore, the more you zoom in, the lower the quality of the photo will be. Don’t use zoom when you want to photograph a distant subject. Instead, get closer to it and take the photo normally without any zoom. In this way the results will have much more quality.

If it isn’t possible to get closer, it’s still preferable not to use zoom. Rather, you can bring the viewer closer to the subject when you’re editing or cropping the photo. Cropping the photo after taking it allows you to have more control on how much of the photo you want to delete.
6. Use the right
camera mode
Use the right camera mode such as portrait, night, or panorama according to the situation and the subject.
7. Keep your
phone steady
Keeping your phone steady is very significant particularly when you’re photographing in low light or at night. In such situations, the camera has to use lower shutter speed to get sufficient light to the sensor. Therefore, any camera movement or shake will lead to a blurry photo. You have to grip your phone firmly with both hands or rest it on a solid surface in order to keep your phone steady and prevent blurry photos. Also, you can use a tripod. There are different kinds of tripods suitable for different mobile phones.

When using a tripod, you can improve your accuracy more by using self-timer. We recommend you set the timer on 3 seconds. In this way, you won’t need to touch the phone when the photo is being taken and thus it will stay steady. This may seem a little overdoing, but it will be very helpful when photographing in low light. Another trick is using the volume buttons on headsets as the shutter button of the camera. Some smartphones are equipped with this feature. If your phone doesn’t support this feature, you can use Bluetooth shutters. Therefore, you will be able to place your phone on the tripod and take photos without any physical touch to avoid camera-shake.
8. Consider
proper lighting
The best kind of lighting in photography is indirect and soft natural light like the light coming through a window with a silk curtain or the light in a cloudy day. You should note that, normally, the light source should never be positioned behind the subject as it will make the subject appear very dark in the photo.
9. Mind the
composition
Achieving correct focus and exposure are among the vital principles of photography. Nonetheless, proper composition is as much important. Without good composition, your photos probably won’t be very eye-catching. The rule of thirds is one of the most helpful composition techniques in photography. As this rule could be used in all genres of photography to create more attractive and balanced photos, learning this concept is very crucial.
10.
Shoot from different perspectives
It’s always better to consider different perspectives wherever you’re photographing. Most beginner photographers take their photos in standing position. However, one of the advantages of mobile phones is that because of their small dimensions and low weight, you can use them in places and positions that larger cameras won’t come in handy.
11.
Pay attention to the background
Try to use simple and plain backgrounds. Plain background helps the viewer focus on the main subject. When the background of the photo is crowded, it may divert the viewer’s attention from the intended subject. If the background includes too much opposing and confusing colors, the best solution is converting to the photo to black and white. Removing the colors will prevent the potential diversion of attention.
12.
Don’t content yourself with one photo
Always take several photos even if you think that the first one you’ve taken is perfect. The chance of achieving a great photo in the first take is very low. It’s better to shoot from different angles and distances. Check the previous photos to grasp the correct conception of dos and don’ts. Whenever you get to an angle that seems great for you, take a few photos from that position. This will assure you that you will have a photo with great composition and correct focus.

One of the benefits of digital photography is that you simply delete all the photos that don’t meet your expectations… and there’s always a lot of these unacceptable photos! Also you shouldn’t fear taking bad photos. No one will ever see them.

13.
Use Panorama mode
Sometimes there’s a situation in which using the standard
mode of the camera won’t do justice to the scene you’re trying to capture. For
example, you may want to shoot a vast landscape, an urban view, or a wide
building but you can’t fit the whole scene in one frame. This is when panorama
mode could be of help.
Normally, panorama mode works as follows: you hold your phone horizontally towards the left side of the scene you want to capture, then move to the right side slowly after you’ve tapped the shutter button. When you reach the end of the scene, you can tap the shutter button again to stop recording. The more slow and continuous this horizontal movement be, the better the results will be.
14.
Don’t edit your photos too much
Finally, you’d better restrain your enthusiasm for using
apps or adding powerful effects when you’re editing the photos. Many novice
photographers mistakenly think that using editing apps can turn a bad photo to
a good one. After so many years, we have endeavored enough in this field and
experience tells that this conception is incorrect.
Before using any apps, you have to focus on taking a clear photo with great composition. Apps could be beneficial to improve a good photo, but this isn’t the case with bad photos. One of the most common mistakes is excessive use of HDR (High Dynamic Range). HDR can be helpful to regain the lost details in dark photos, yet you still have to be careful when you’re using it.

In the following sample, the HDR tool of Snapseed has
been used to a high degree. Then, the birds and the lightning have been added
by AlienSky and LensLight, respectively. However, because the original photo is
too dark, the use of full HDR effect has led to a grainy (noisy) photo with
excessive color density. The birds and the lightning are added to show that
using such effects out of proper context could seem unreasonable.
Therefore, edit your photos humbly. Only add those
effects that improve the natural beauty of your photos. Be careful when you’re
using exposure and color settings to avoid grain and over-density of colors. If
you feel that you have overused a tool, undo it.
These tips could help you be on the right track to take wonderful photos with your mobile phones. Nonetheless, some of them such as using gridlines and the rule of thirds will come in handy regardless of what camera you use. The most important thing to remember is that keep shooting and enjoy!
Source: iPhone Photography School
-415x200w.jpg "The New MacBook Air and Pro 2020")

-415x200w.jpg "LiDAR technology on iPhone 12 pro")


Leave a Comment